By default, the preview window is designed to be unobstrusive and to automatically close after a short preview unless the user moves the mouse into the preview window. When the user moves the mouse into the preview window, it will stay open as long as the mouse is within the preview window pane.
If you want to make the preview window stay open indefinitely, to disable the automatic close, click on the pin image button in the upper right hand side of the preview window. This will make the preview window pane stay open for the currently selected item as well as subsequent selected items. To make the preview window pane start auto-closing again, simply click the pin button again.
To make the preview window pane larger, you can drage the edges of the preview pane for any particular selected item, or you can simply maximize the size of the main application window. When the main application window is maximized, the preview pane will be maximized to the full size of the left hand topics results pane if an item has been selected.
Adding and Managing Keywords
In AKIN, keywords can be added to any topic or item to make finding the topic or item easier the next time or to help you group certain items together. When you search in the main user interface search text box, AKIN automatically looks for items containing keywords similar to the search text and shows results in the lower left and right hand panes.
Adding keywords to any topic or item is as easy as right clicking on the item to bring up a context menu, and selecting Keywords Tag.

If the item you added a keyword to is a file or file system directory folder there is a chance that the file or folder could be moved or renamed at a time when AKIN is not started and not monitoring these changes. If that happens, this will cause any keywords associated with that item to become disassociated. AKIN will periodically try to automatically fix these broken associations. However, at any time you can manually run the auto-repair process from within the Scan Settings form.

AKIN cannot guarantee 100% success. It is advised to keep AKIN running in the background to monitor directory and file changes if you have a lot of keywords associated with these items. However, the automatic repair is very good and finding and fixing these associations, especially if the change was to the location of the file as opposed to the name of the file, or if the name changed, the name is still similar enough to the original to find the association. Again, it is recommended that if you use AKIN to manage keywords on a lot of file items, that you keep AKIN running when making any changes to where files are located or to their names.
AKIN remembers the keywords you have assigned to items even when you do index rebuilds and change monitored directories over time. These keyword associations are stored in the AKINData directory under My Documents in a file called KeywordTags.akn. Please do not delete this file or you could permanently lose all the keywords you’ve assigned to topics and items.
Browsing Topics and Items
In addition to pattern recognition search, AKIN provides the ability to browse all of the topics it has indexed as if these were all stored on a single virtual directory. Although you can browse most of the items that AKIN indexes, due to the potential volume of uncategorized items that Outlook represents, Outlook items are excluded from the browsing feature at this time. To browse Outlook items we recommend that you use Outlook.
To open the browse window simply press the “Browse” button. You can browse all the topics/folders within directories you’ve scanned.

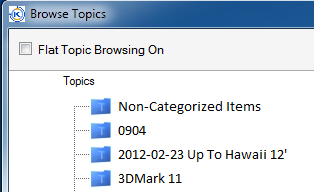
Notice the blue folders. Blue folders in browsing or context views indicates that you are viewing a root topic and if its sub-topics are blue folders this means nothing has been hidden from view (see “Noise Reduction”) Note however, the check box above called “Flat Topic Browsing On”. If you check that box, it will turn on a feature called Flat Topic Browsing.
Topics normally all reside either at the root, or “under” other topic hierarchies. Flat Topic Browsing takes all the sub-topics under all root topics and brings them all up to the same surface level.
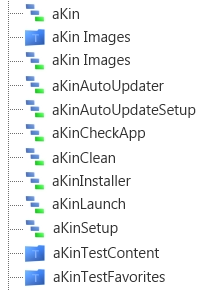
This means we can literally see EVERYTHING in one view without having to dig down into hierarchies to fish for things, which can be fatiguing.
Rather than presenting you with several entries for each sub-topic that is found, the sub-topics are “consolidated” into context views (see “Context Views”). Notice that we now we see both blue folders and another icon that means we are viewing the entire set of contexts for a given topic.

This is very useful because sometimes we organize things down deep in some hierarchy of information, and then we forget where exactly we placed it or what exactly it was called. With AKIN, you have more choices. You can either go digging around in various hierarchy trees to try and find it, or you can just bring ALL of the topics to the surface and quickly scroll through them to see if you recognize the topic you are looking for. If you find it, you can simply expand it and it will let you know where it was located and also the other items associated with it.
Sticky Work Surfaces and Context View Surfaces
The AKIN user interface work surfaces are in many ways dynamic, rather than the normal static surfaces you’ll get from other search tools. For example, items in the items panes can be dragged onto the topics pane to explore their context. Also, both topics and items can be “pulled out” by gestures to create separate context view or sticky work surfaces. Pulling a topic or item to the left quickly and releasing will open a context view and pulling to the right quickly and releasing will open a sticky work surface.
The purpose of the Sticky Work Surface is to allow you to place and group any combination of topics and items on the surface and work with that information instead of having to have multiple windows open constantly. These surfaces can be “docked” to the AKIN UI, or “pinned” to an area of the desktop screen. This allows you to reduce the number of windows you need to have opened at any time, and provides a convenient way for you to organize tasks, work with the information, and come back to things later. Items on this list can be manually re-ordered by dragging them up or down.
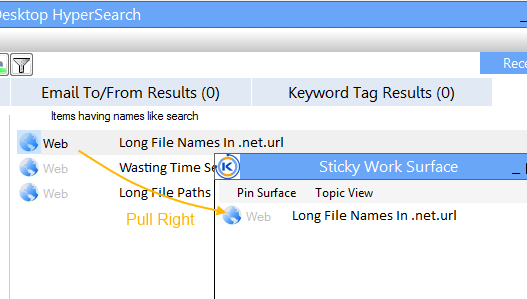
Clicking on any item and dragging quickly to the right will open a new Sticky Work Surface and place the item on the surface. Then, you can drag any other additional topics or items onto that surface.

Notice that you can even drag music onto the surface, and when you do it shows a “Playlist” menu that you can click on and it will automatically create a playlist for any music items present and open Windows Media Player to play it.
Context view
Surfaces are similar in that they allow the user to drop multiple items on the surface so that you can have one view that lets you explore the context of multiple items rather than having a bunch of windows open or needing to close and re-open windows multiple times. The difference is that context views are specifically for the purpose of working with topic or item context temporarily.
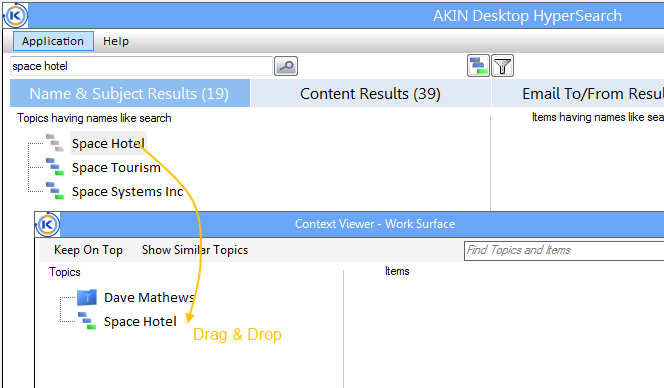
As mentioned above, context views do not only accommodate topics but also items. You can drag any item into a context view to instantly see the full context of that item. Where does it reside? What other items in your system have similar names (and where are they)? What other topics are related to this item?
Topic Pinning
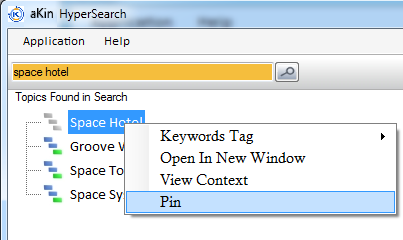
Topic pinning is another helpful feature that allows you to investigate and explore various topics simultaneously on the same surface. You search for a topic and if it’s something you want to keep it in view on the surface even if you search for other topics, you simply right click on it and select “Pin”. It will be pinned at the top of the results and remain there when you perform other searches.
Sorting Search Results
Search results are presented to the user in a specific order based on similarity score and relevance, and items listed under a particular topic are listed alphabetically. However, the user has the ability to change the sorting of the items at any point by right clicking in the Items pane and selecting “Sort”, and then selecting the field you wish to sort by.
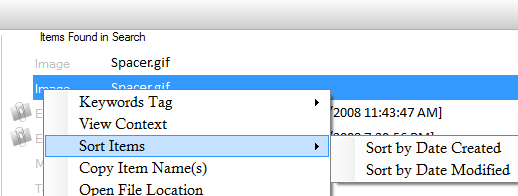
When you turn on user sorting, a new control will appear to the right of the list that allows you to quickly change sorting direction Ascending or Descending and also pick the sort field.

Outlook Integration
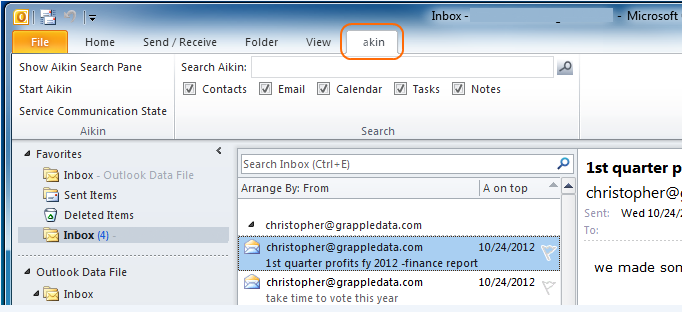
AKIN is tightly integrated with Outlook, and allows you to search AKIN from within the context of the Outlook email explorer:
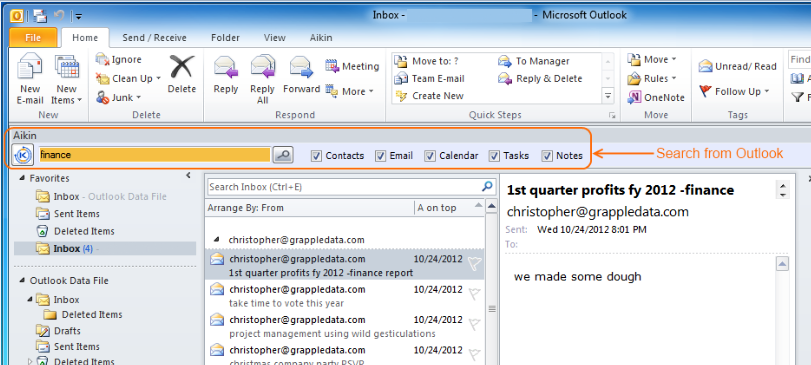
Just type in a search phrase and AKIN will pop up with results you can use.
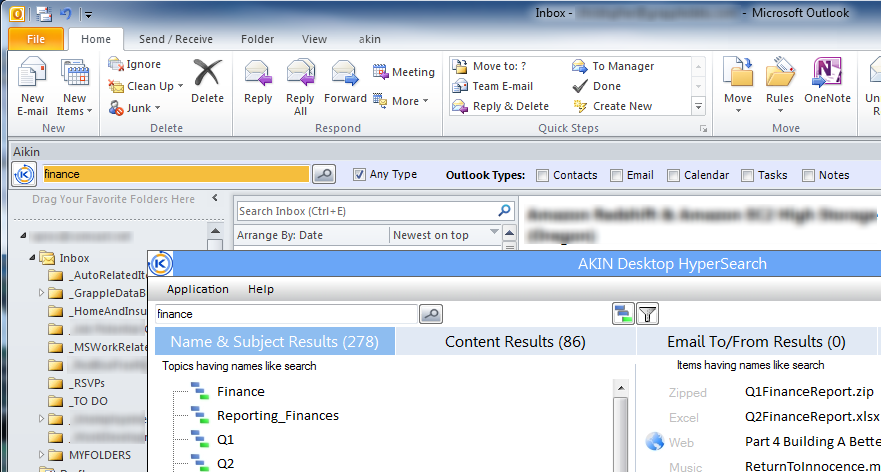
If you don’t want the AKIN search pane visible, you can always close it, and use the AKIN ribbon tab to perform searches:
Viewing file locations and directories
Any file system folder or file that is scanned by AKIN and presented to the user can be accessed by double clicking on it to open it. Also, by right clicking on the topic or item you can open the actual file or folder location of the file system object and view all the other items within that file directory. Thus, you always have access to the actual file or directory itself.
Renaming files to a common name
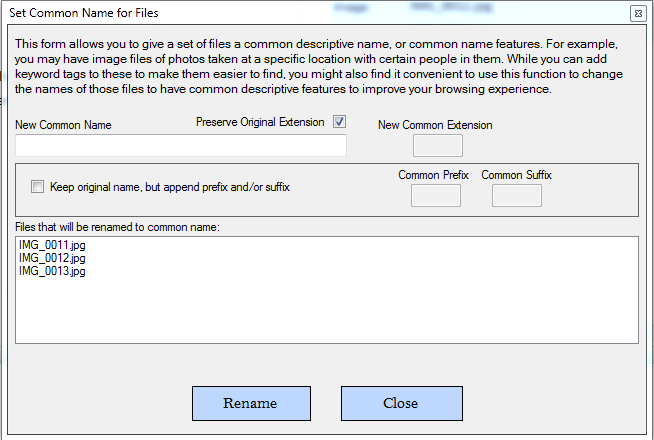
Sometimes a user will want to rename a large number of files such as documents or image files from a camera to some more descriptive common name. If you are viewing the items under a common single topic, you can select multiple items, right click for a context menu and select “Rename Files to Common Name”.
This form will allow you to not only give the files a common name; it will automatically add a numeric to each of the selected files to differentiate it. This sort of functionality is also present in the Microsoft Windows Explorer file system itself. However, AKIN also adds the ability to keep the original name, and to append a common prefix or suffix to the file name. It also allows you to give all of the selected files a common extension if they don’t already have one and you want them to.
TOOLS
AKIN Directory Analysis Tool (ADAT)
The AKIN Directory Analysis Tool (or ADAT) was developed to help users compare and analyze the differences between two file directories. So, what is different about
the approach AKIN uses?
To make difference assessment fast, it relies primarily on file modification dates instead of a byte by byte comparison, which would be much slower if you had a lot of large files.
(it does provide a byte by byte comparison of files when specifically requested however).
Its also been developed to make analysis of certain scenarios extremely fast and easy in a way that is not generally supported by other tools.
Here are some of the scenarios where the ADAT tool can prove very useful:
1. When you are backing up files between two directories and they’ve become out of sync for whatever reason and either:
A. you don’t want to have to copy the entire contents of one directory over to the other to put them back in sync
B. and/or you may have added different new files and directories to both locations without realizing it and want to make sure you don’t delete something in either directory that was important to keep
2. You have things like media files from cameras and other devices that you copy to another drive periodically, but you lose track and don’t remember what files you’ve copied and haven’t copied over.
3. You copy files from one directory to another but not in the same exact structure. You tend to organize some files a little differently on one drive and just want to make sure you’ve transferred all important files from one directory to another regardless of organizational structure.
To help you with these and other scenarios you may think of, the ADAT tool provides functionality to carry out two primary tasks:
1. Show the differences between two file directories using their exact structure. In other words, it will show what directories and files in the source or target do not exist in the other.
2. Regardless of structure, show files in the source directories that don’t exist ANYWHERE in the target directory and vice versa.
To perform analysis:
1. Choose the directories you want to compare and analyze

2. Choose the type of analysis you want to perform

3. Make sure the desired criteria for considering two files to be the same is set correctly

4. Click on the Run Analysis button

5. Examine the results
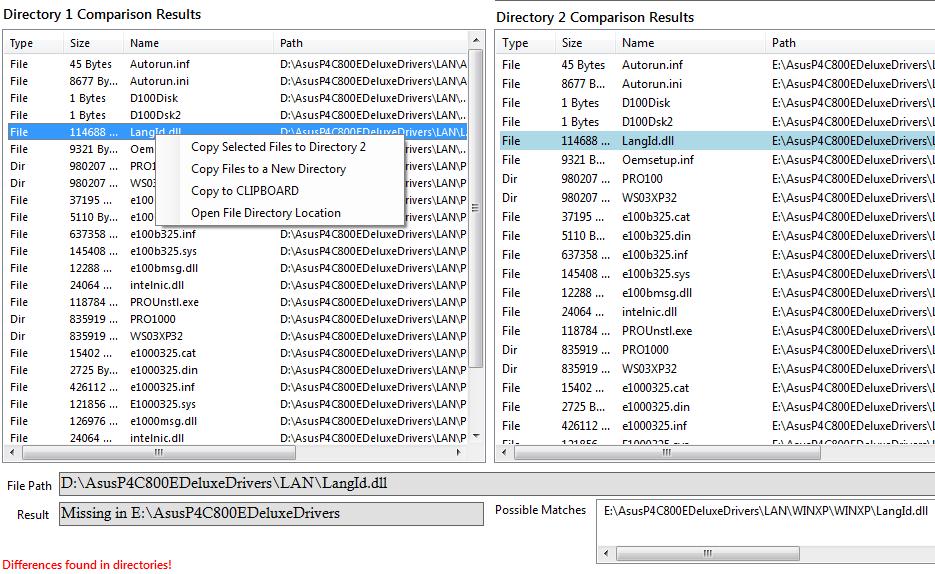
Notice the example in the list above. The source file "D:\AsusP4C800EDeluxeDrivers\LAN\LangId.dll" is not found in the exactly corresponding directory. However, it is found in the "E:\AsusP4C800EDeluxeDrivers\LAN\WINXP\WINXP" directory.
Once differences have been identified, they are listed in the results list boxes for the corresponding directory. The user then has the ability to perform some various operations over these results. You can:
1. Copy missing files from one directory to the other preserving their exact directory structure so that the two directories are now more closely in sync.
2. Copy any listed files to any other directory and either preserve the directory structure or not.
3. Copy the list of items to the clipboard so that it can be pasted into a working surface like a document or spreadsheet. (NOTE – A future Excel export function is being planned)
4. You can double click on any listed item and either open the directory location, or in the case of files, you can also open the file itself using the default windows program assigned to files of that type.
Another useful feature provided is that when you click on any item in one directory results list, the tool will automatically look for anything in the other directory that is a possible match even though it may not have the same exact directory path structure. (NOTE – A fuzzy version of this functionality is on the tool’s roadmap as well). These possible matches are listed in the “Possible Matches” list near the bottom of the form. You can right click on these items and open up their directory location for inspection, or in the case of files you can open the file as well. Additionally, when there are results in both directory lists and any of the possible matches exist in the opposite list, those matches are highlighted to make it easier for you to inspect them and any surrounding items in the list.
NON-DESTRUCTIVE
The file operations performed by the ADAT are non-destructive. That means that the ADAT will NOT delete existing files when performing copy operations.
When you copy a file from one directory to another and a file already exists within that directory, the ADAT will not overwrite the file, and it will not give you the option to overwrite the file.
Instead, the ADAT will rename the existing file preserving the original name, but appending “_AKIN” and a numeric like “_AKIN2” depending on how many files with that name already exist at the location.
In this way, AKIN preserves any existing files and NEVER overwrites those files. It is up to you to delete or remove those pre-existing files
if you wish either using the tools provided by the Windows Operating System, or the Delete context menu item that will only appear for items having a name that contains
"_AKIN" within the name. For this reason, neither the AKIN Directory Analysis Tool nor Grapple Data Technology are responsible or liable for any data that may be lost when you delete files as deletion must be
performed explicityly by the user.